Visual Scripting
Coding can be daunting, which is why The Mirror provides no-code visual scripting out-of-the-box to make it easy for people of any skill level to build in The Mirror. Visual scripting is still programming, but high-level, and without needing to write code as text. Full support for GDScript is also available if you prefer writing text-based code, but we recommend learning the Mirror through visual scripting first so that you can learn the API.
The original idea was inspired by Godot's own visual scripting that was present in the engine prior to version 4.0 before it was discontinued. Visual Scripting in Godot was a key reason we chose Godot; we were sad to see it removed from Godot 4 and are excited to bring it back to you in The Mirror.
You can check out the announcement video and a quick note about visual scripting on our Youtube channel:
Global vs Object Scripts
Scripts in The Mirror can be attached globally to the whole Space, or attached to a specific object in your Space.
Global scripts are used to affect the game on a global level. For example, you can use them to make a score tracker that gives points when a player kills an enemy.
Object scripts can be attached to any Object. Their execution Space is local to the object they are attached to. For example, you can make a medkit that heals the player when they interact with it.
Your First Global Script
Creating a global script is simple:
Open Build Mode by pressing B on your keyboard.
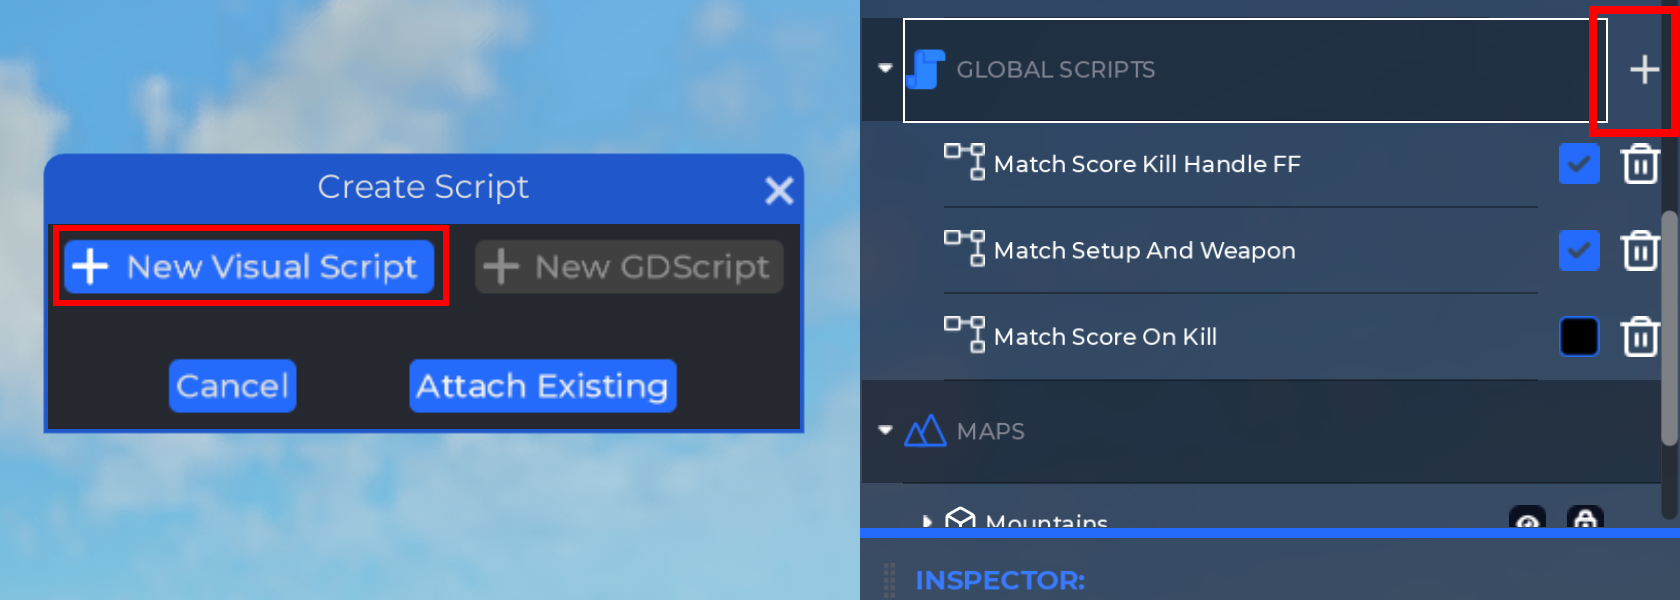
On the right side, under Entities, next to the "GLOBAL SCRIPTS" category, click on the "+" sign. The "Create Script" popup will appear.
Click on "New Visual Script" to make a new visual script. The visual scripting editor will appear, filling the bottom half of the 3D viewport.
The "Create Script Entry" dialog will appear, prompting you to pick an entry point for your script. Entry blocks determine when the script runs, such as when an event happens. You can add more entry blocks later.
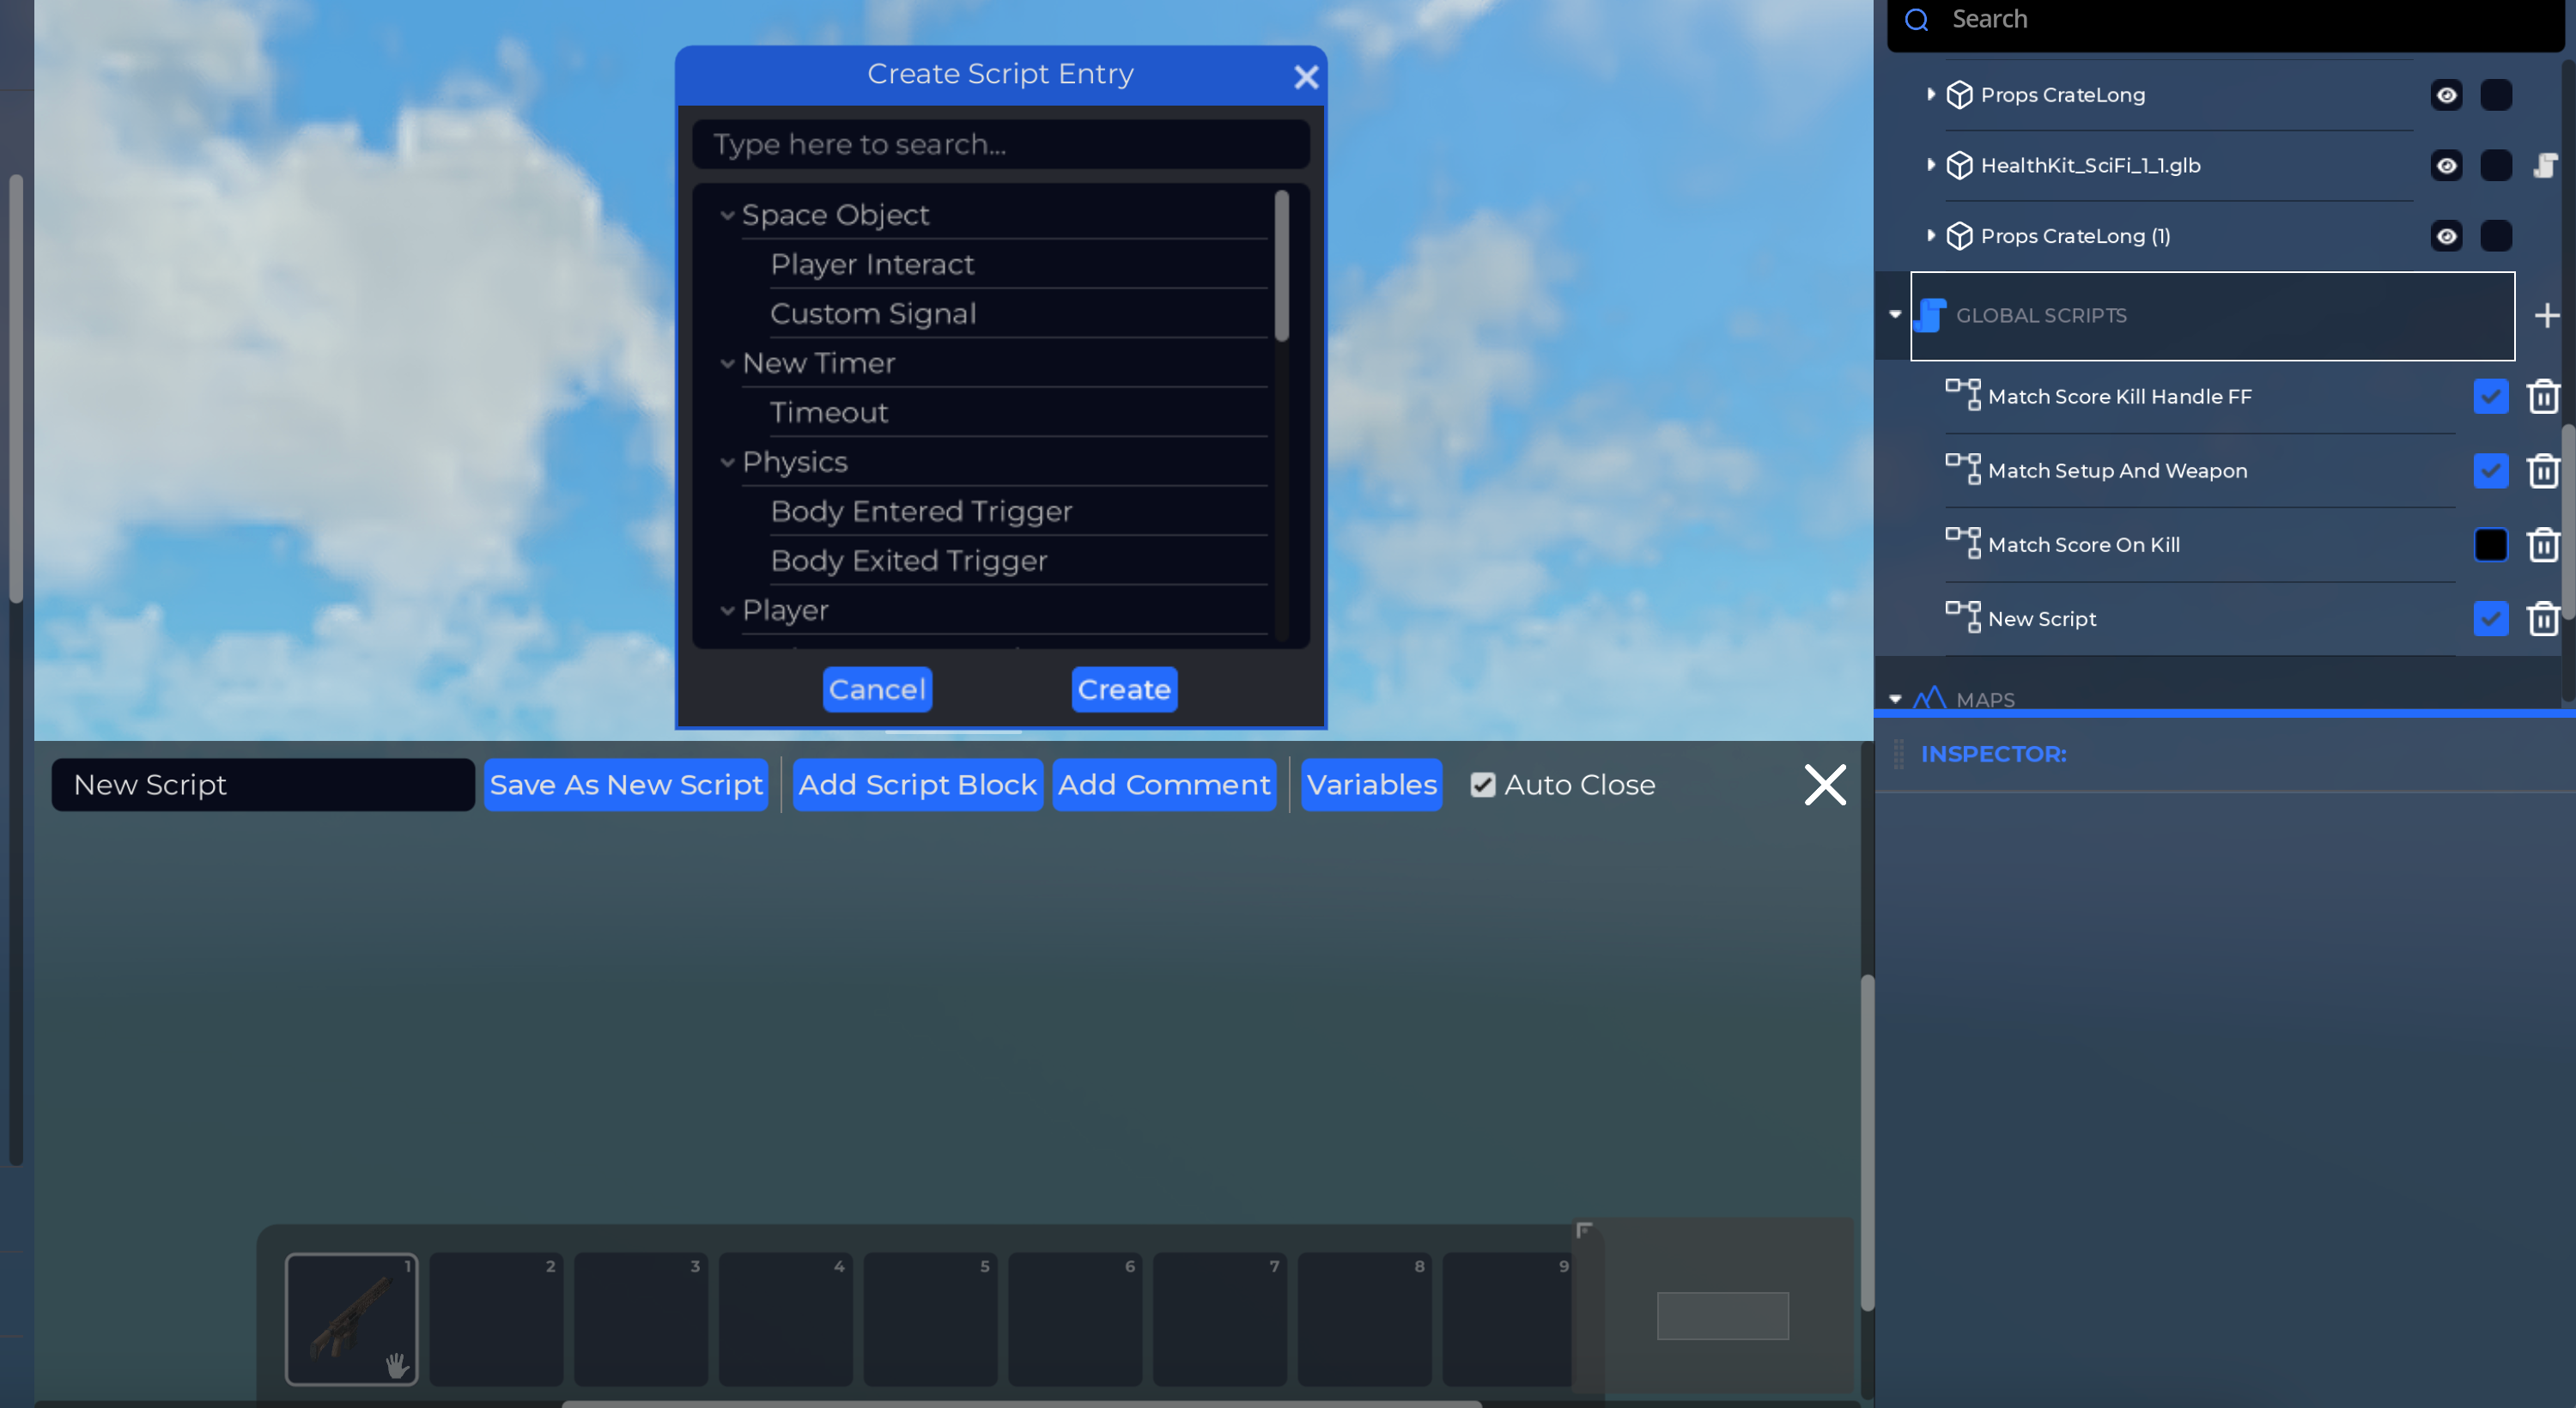
For experimenting with scripts, a simple entry to use is the "Timeout" signal under "New Timer". Select it, and either double-click on it, or click "Create" to add this entry to your script.
Canvas Controls
Now that you have a script created, you will need to be able to navigate the script editor. Take note of these controls, practice panning around.
- Windows
- Mac
- Linux
- VR
| Input | Action |
|---|---|
| Left Mouse Button | Click on a block to select it |
| Hold Left Mouse On Empty | Drag a box to select blocks |
| Hold Left Mouse On Block | Drag to move selection |
| Hold Left Mouse On Port | Drag to connect port |
| Mouse Wheel Scroll | Zoom in/out |
| Hold Middle Mouse Button | Pan view |
| Hold Right Mouse Button | Pan view |
| Quick Press Right Mouse | Create script block |
| N key | Create comment |
| Delete or Backspace | Delete selection |
| CTRL + C | Copy selection |
| CTRL + V | Paste selection |
| CTRL + D | Duplicate selection |
| Input | Action |
|---|---|
| Left Mouse Button | Click on a block to select it |
| Hold Left Mouse On Empty | Drag a box to select blocks |
| Hold Left Mouse On Block | Drag to move selection |
| Hold Left Mouse On Port | Drag to connect port |
| Mouse Wheel Scroll | Zoom in/out |
| Hold Middle Mouse Button | Pan view |
| Hold Right Mouse Button | Pan view |
| Quick Press Right Mouse | Create script block |
| N key | Create comment |
| Delete or ⌦ | Delete selection |
| CMD + C | Copy selection |
| CMD + V | Paste selection |
| CMD + D | Duplicate selection |
| Input | Action |
|---|---|
| Left Mouse Button | Click on a block to select it |
| Hold Left Mouse On Empty | Drag a box to select blocks |
| Hold Left Mouse On Block | Drag to move selection |
| Hold Left Mouse On Port | Drag to connect port |
| Mouse Wheel Scroll | Zoom in/out |
| Hold Middle Mouse Button | Pan view |
| Hold Right Mouse Button | Pan view |
| Quick Press Right Mouse | Create script block |
| N key | Create comment |
| Delete or Backspace | Delete selection |
| CTRL + C | Copy selection |
| CTRL + V | Paste selection |
| CTRL + D | Duplicate selection |
important
Visual scripting is not available in VR. This is because Build mode is not available in VR.
You can also left-click on the script canvas minimap at the bottom right of the script canvas to pan.
note
Entry blocks cannot be copy-pasted (like the "On Timer Timeout" block we just created). For safety reasons, only regular script blocks can be copy-pasted. For more information on copy-pasting, see the Saving Scripts page.
Creating Script Blocks
Now that you have familiarized yourself with the script editor, let's add some blocks to your first global script. As a minimal test, let's print "Hello World" to the notification area (or whatever text you'd like).
We can create blocks in one of three ways:
Click "Add Script Block" in the top of the script editor to open the Create Script Block dialog. This will show all blocks.
Right-click in an empty spot in the script editor to open the Create Script Block dialog. This will show all blocks.
Drag from one of the colored circles on the sides of the blocks. This will show only blocks that can be connected to the block you are dragging from, by setting the "Show" filter to match where you dragged from.
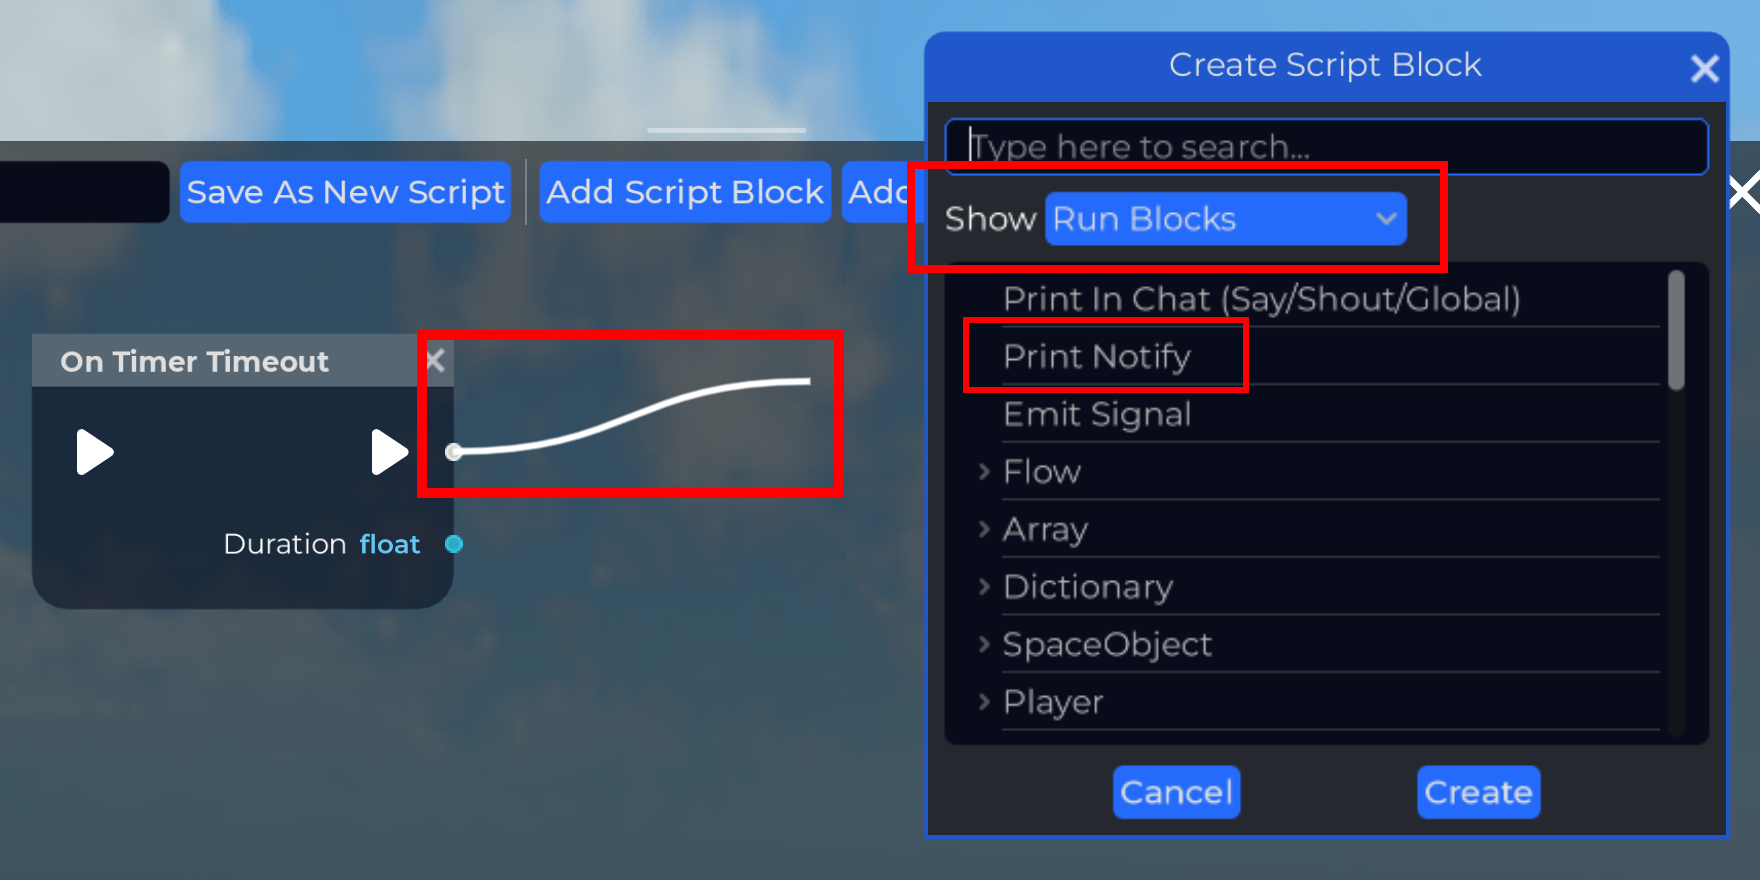
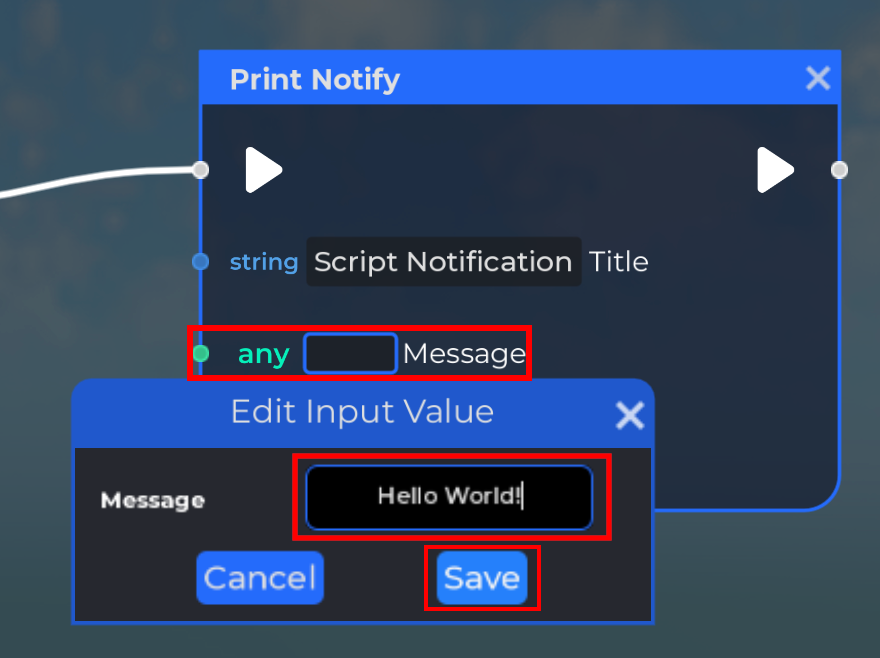
Using any method, create a "Print Notify" block. In the screenshot above, we dragged from the "On Timer Timeout" block's run port, so the "Show" filter is set to "Run Blocks". You can also get to "Print Notify" with "Show" set to "All blocks", which is the default filtering when clicking "Add Script Block", or when right-clicking an empty spot.
note
The script editor automatically saves your progress in real time. You don't have to manually save when making changes.
Each block has a set of ports. The white arrow ports determine the direction of flow and how the script is run. All other colors are for data. Ensure the "On Player Interact" block is connected to the new "Print Notify" block. If not, drag from one white port to the other white port. Clicking on the ports can sometimes be finicky, just keep trying if you mis-click the first time. Once the white line is connected, this tells The Mirror that after the "On Player Interact" block is executed, the "Print Notify" block should be executed.
Next, click on the value button for the "Message" field to edit the message. Type "Hello World", or any text you'd like. You can either press Enter to save, or click the "Save" button.
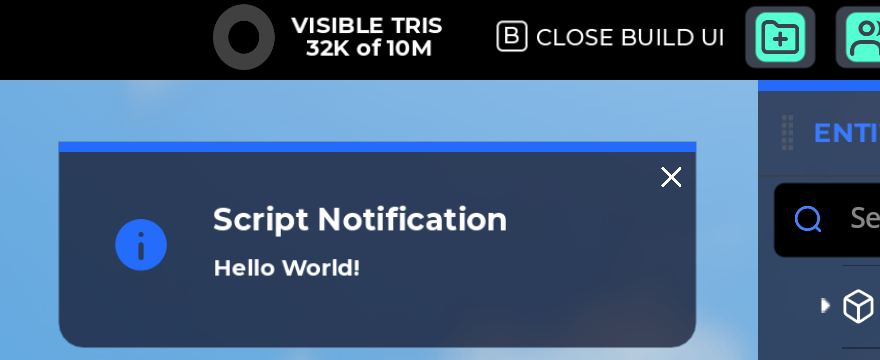
After you do this, you will see this message printed in the notification area at the top-right of the screen. Note that the most recent notification is shown at the top.
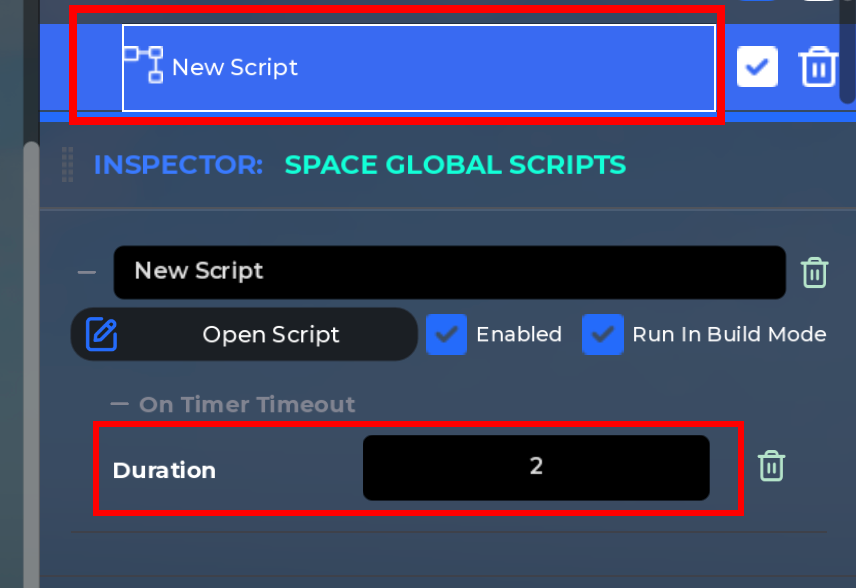
If you want to change the frequency in which the message is printed, we can change the timer's duration.
Next, on your own, take a few moments to try out other blocks. See if you can figure out how to Add two numbers and print the result. Hint: You will need to make a new block and connect it to the Message port by dragging a line.
Your First Object Script
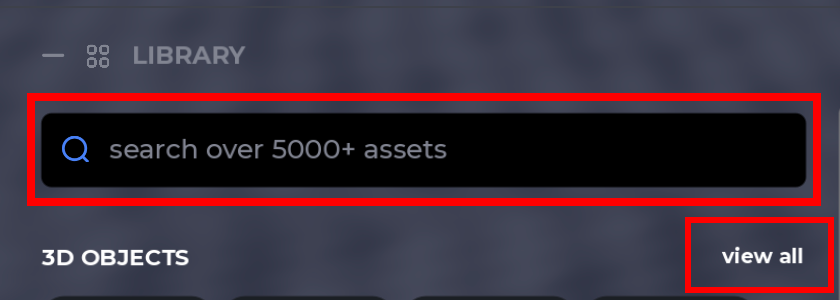
After you are familiar with global scripts, let's learn how to make object scripts. First, if you have not already, create a Object. You can search for models in the asset library by typing in the search bar, or clicking "view all".
Candles
For this first example we will create candles that damage players when they interact with it. You can do this by searching for the desired asset and dragging-and-dropping from the asset library.
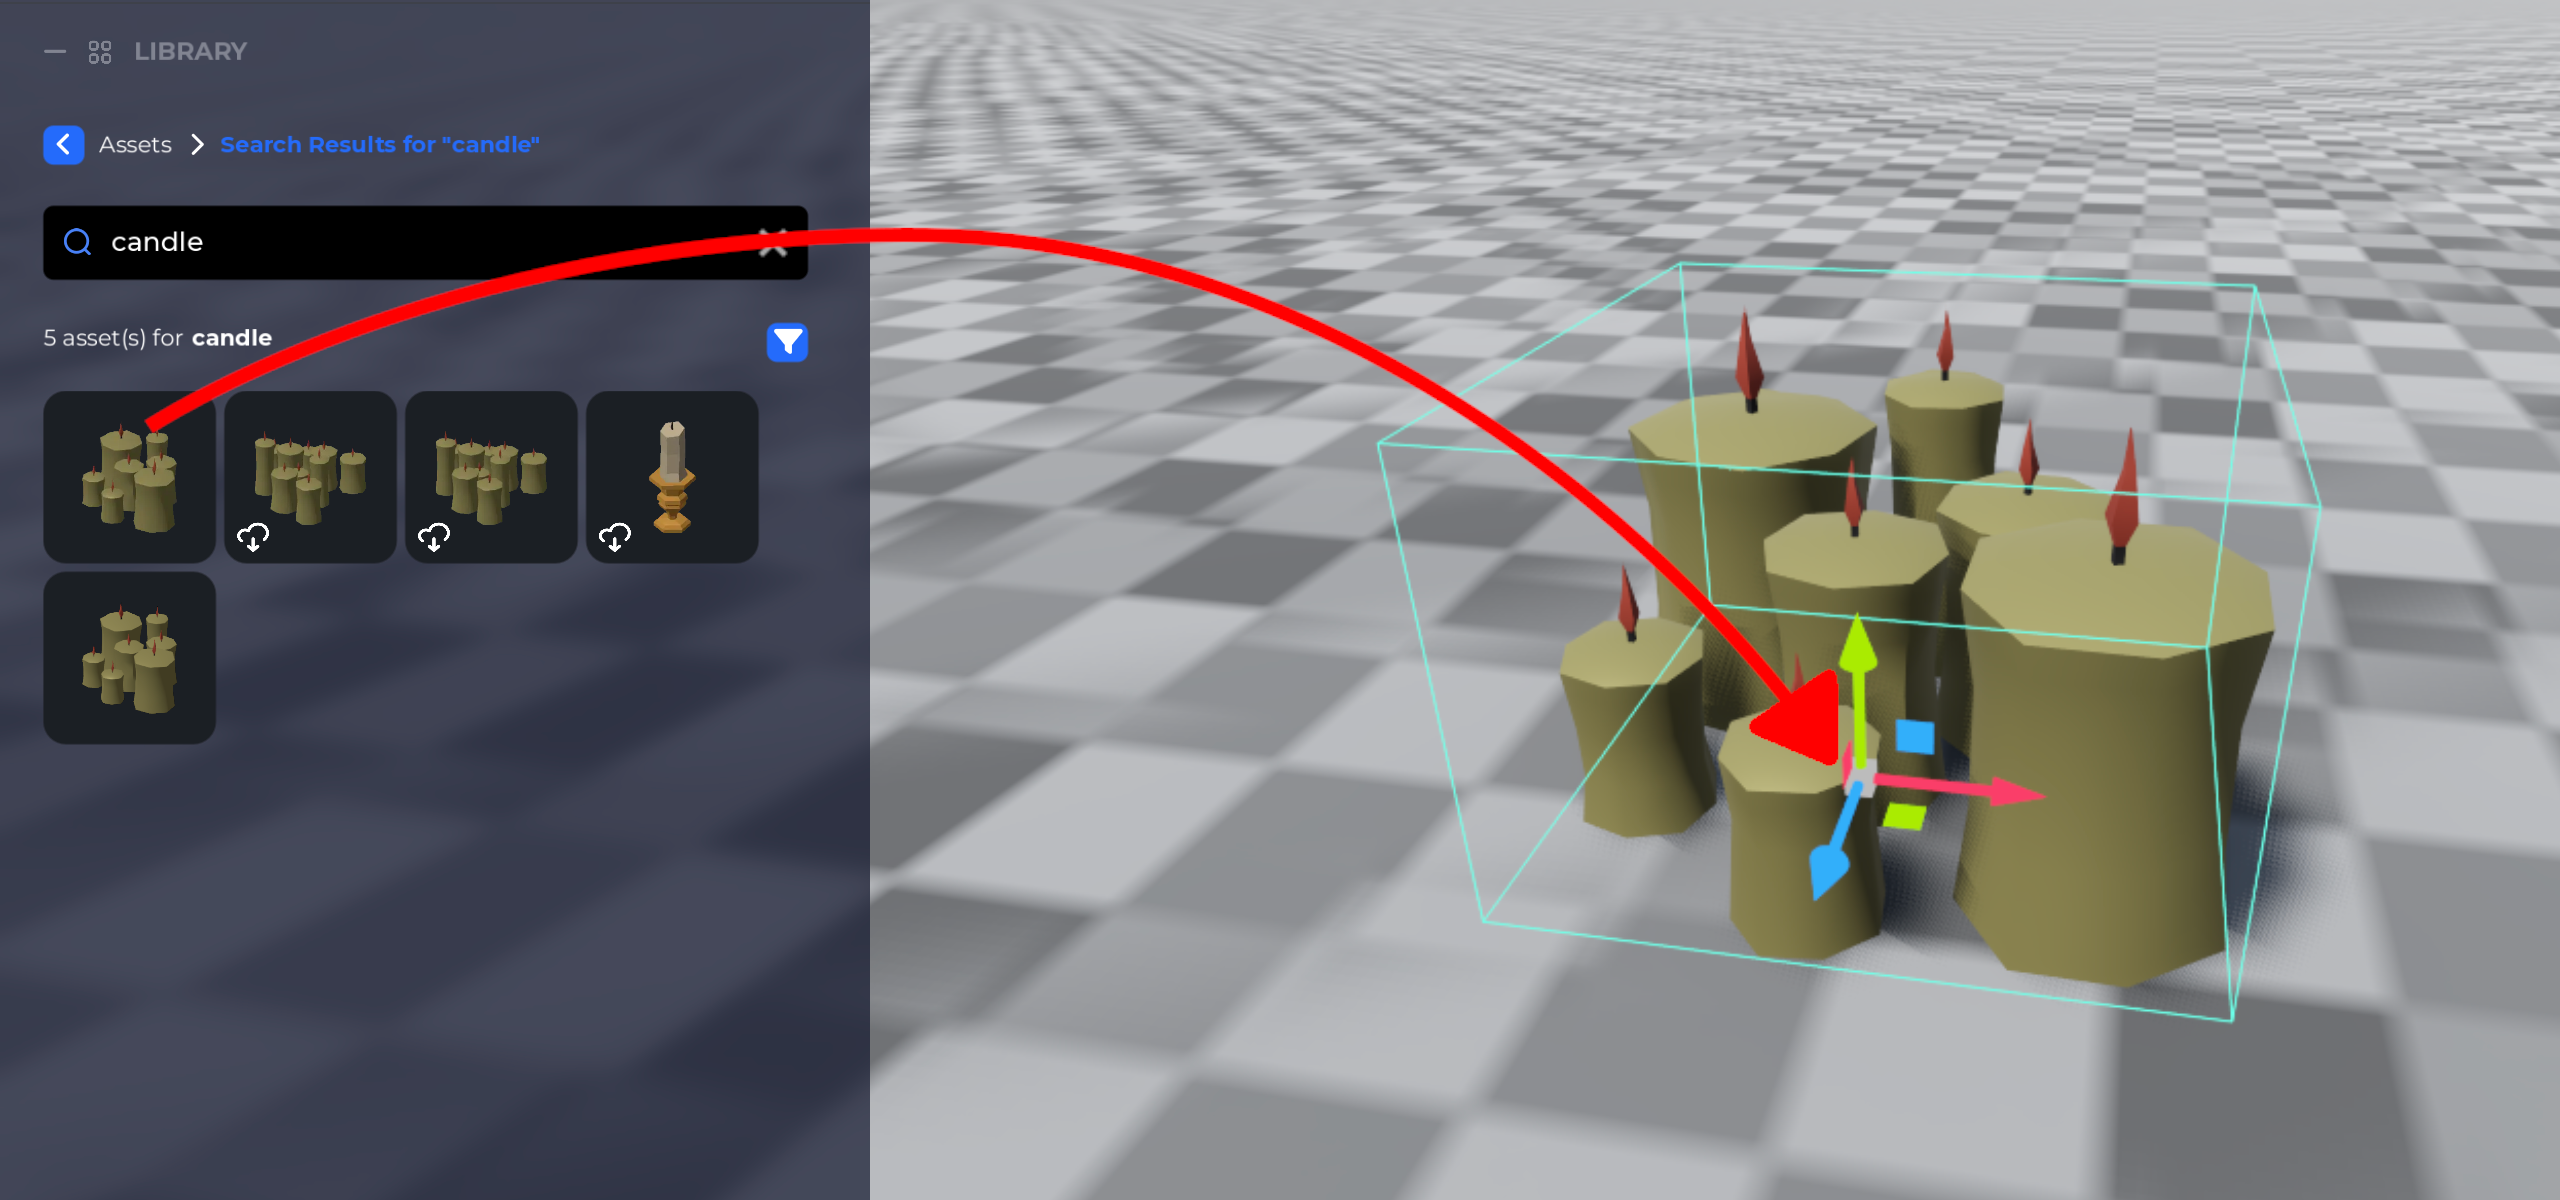
Next, with the object selected (either in the 3D view or in the hierarchy), click on the "Scripting" tab in the inspector. Then click "Add Script" and create a new visual script.

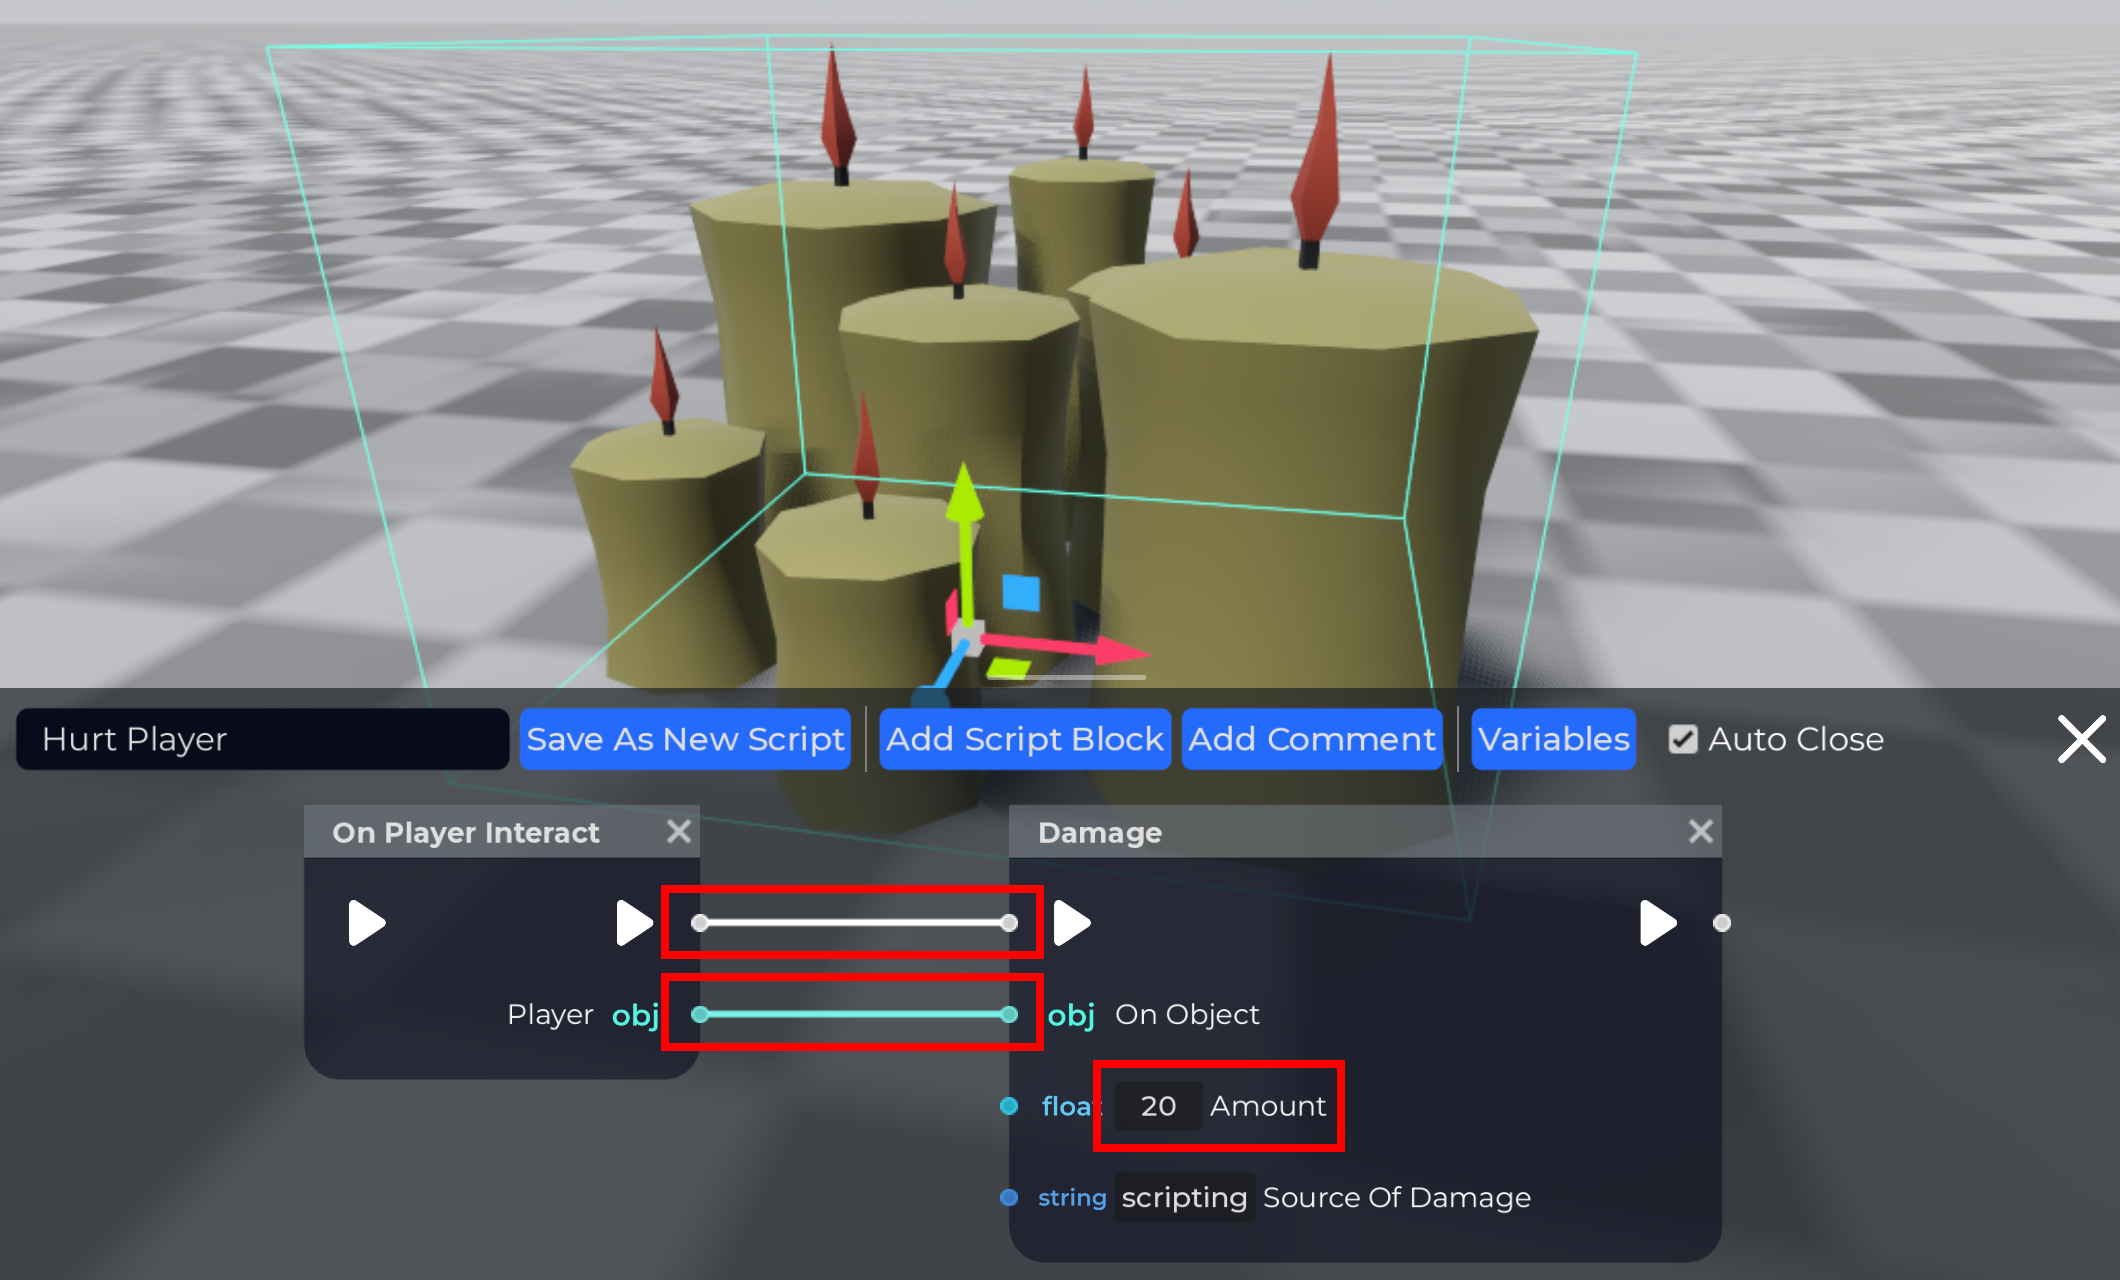
Using the same skills you learned making global scripts, create a "Player Interact" entry, create a "Damage" block, and connect them together. You need to drag from one block's port to another port of a compatible type (usually the same color). You need to connect the white sequence ports, and connect the "Player" obj port to the "On Object" obj port. You should also give the script a meaningful name so you can easily identify it later. The end result should look like this. Pay attention to the lines boxed in red, and the amount of damage.
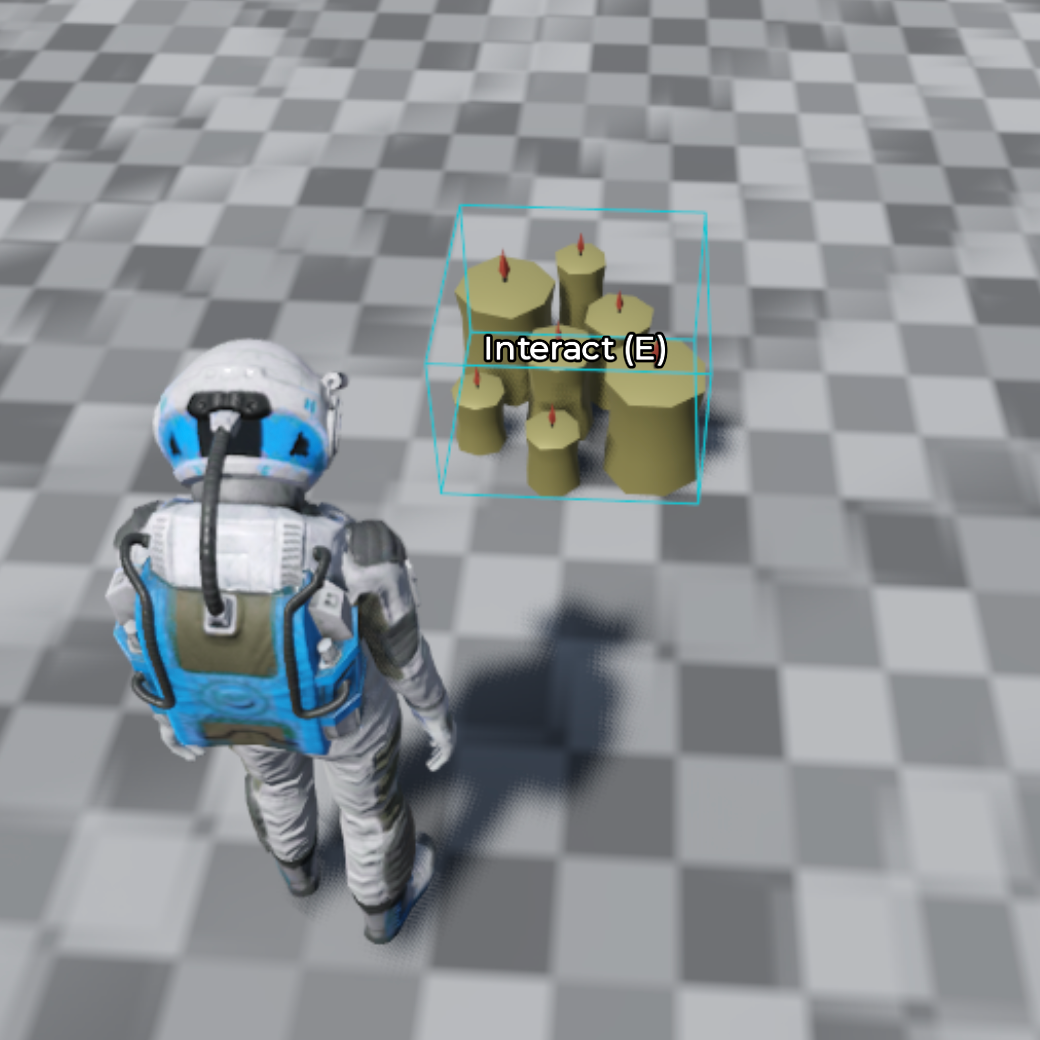
Exit Build Mode by pressing B on your keyboard. With your character, walk up to the candles and look at them. You should see a text that says "Interact (E)".
Now you can press E on your keyboard to use the candles. Note how your character's health is 100 to start. Interact with the object by pressing E on your keyboard and your health will be reduced by 20, the amount specified in the Damage script block. If you press E many times, you will die.
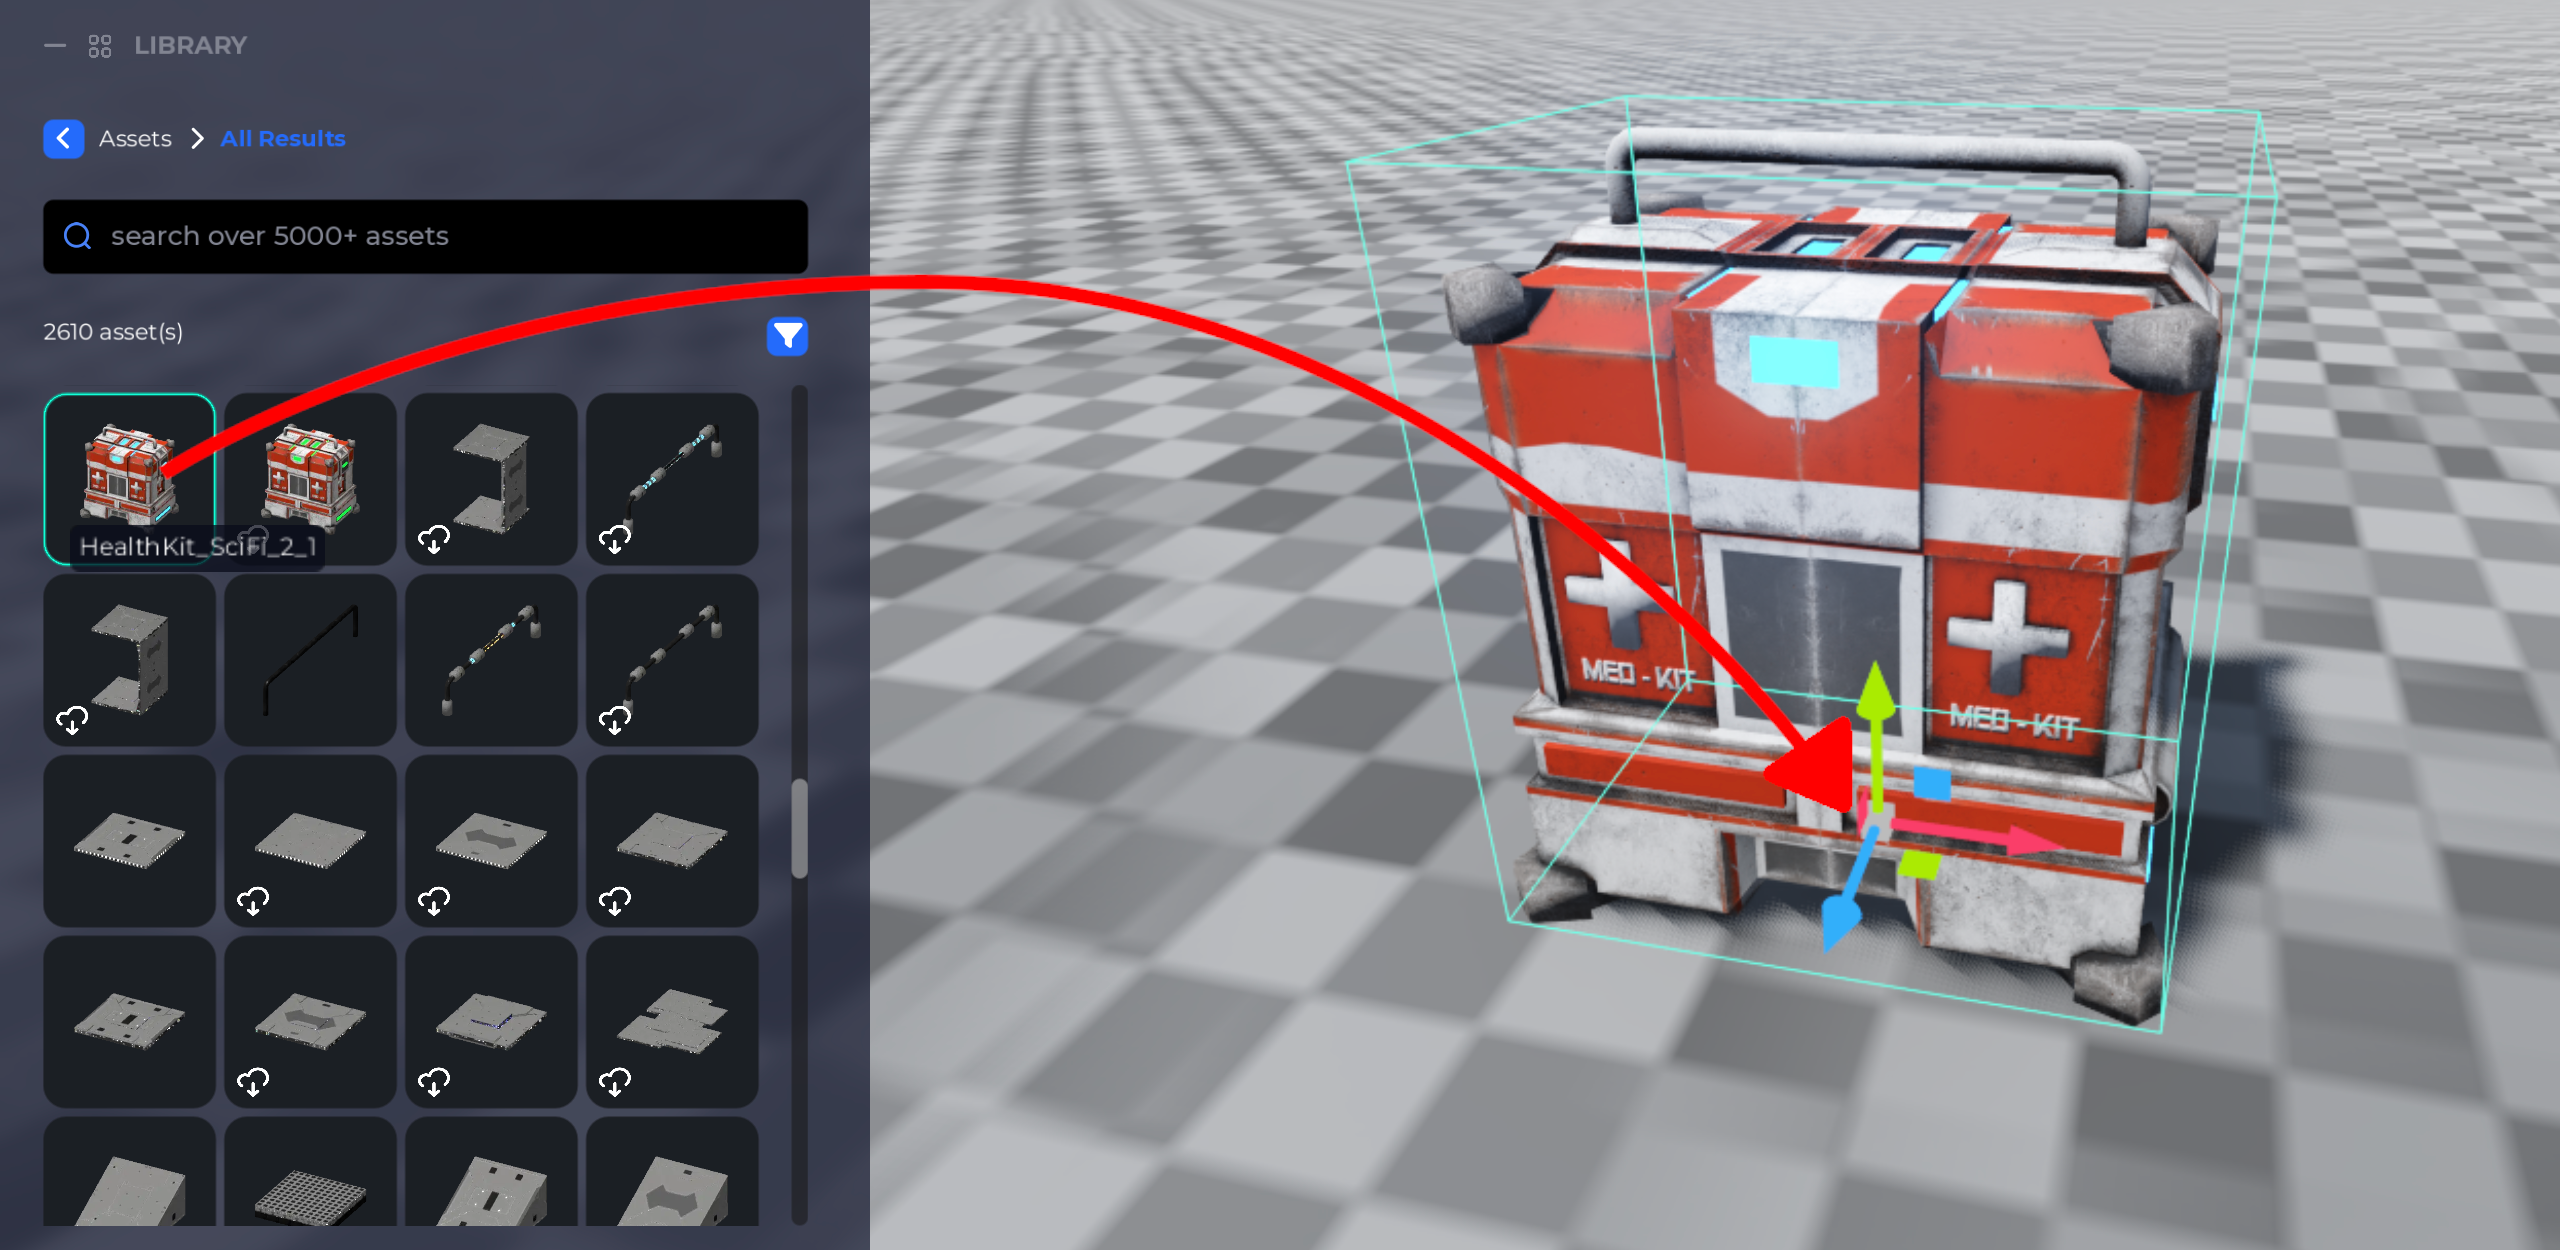
Medkit
Next, let's make a medkit that can heal players. Open Build Mode by pressing B on your keyboard. Similarly to before, let's drag-and-drop a medkit model from the asset library.
Using the same procedure as with the candles, create a "Player Interact" entry, create a "Heal" block, and connect them together. Don't forget to give your script a meaningful name, it's a good habit to get into, otherwise your Space will be full of "New Script 7" scripts. The end result should look like this.
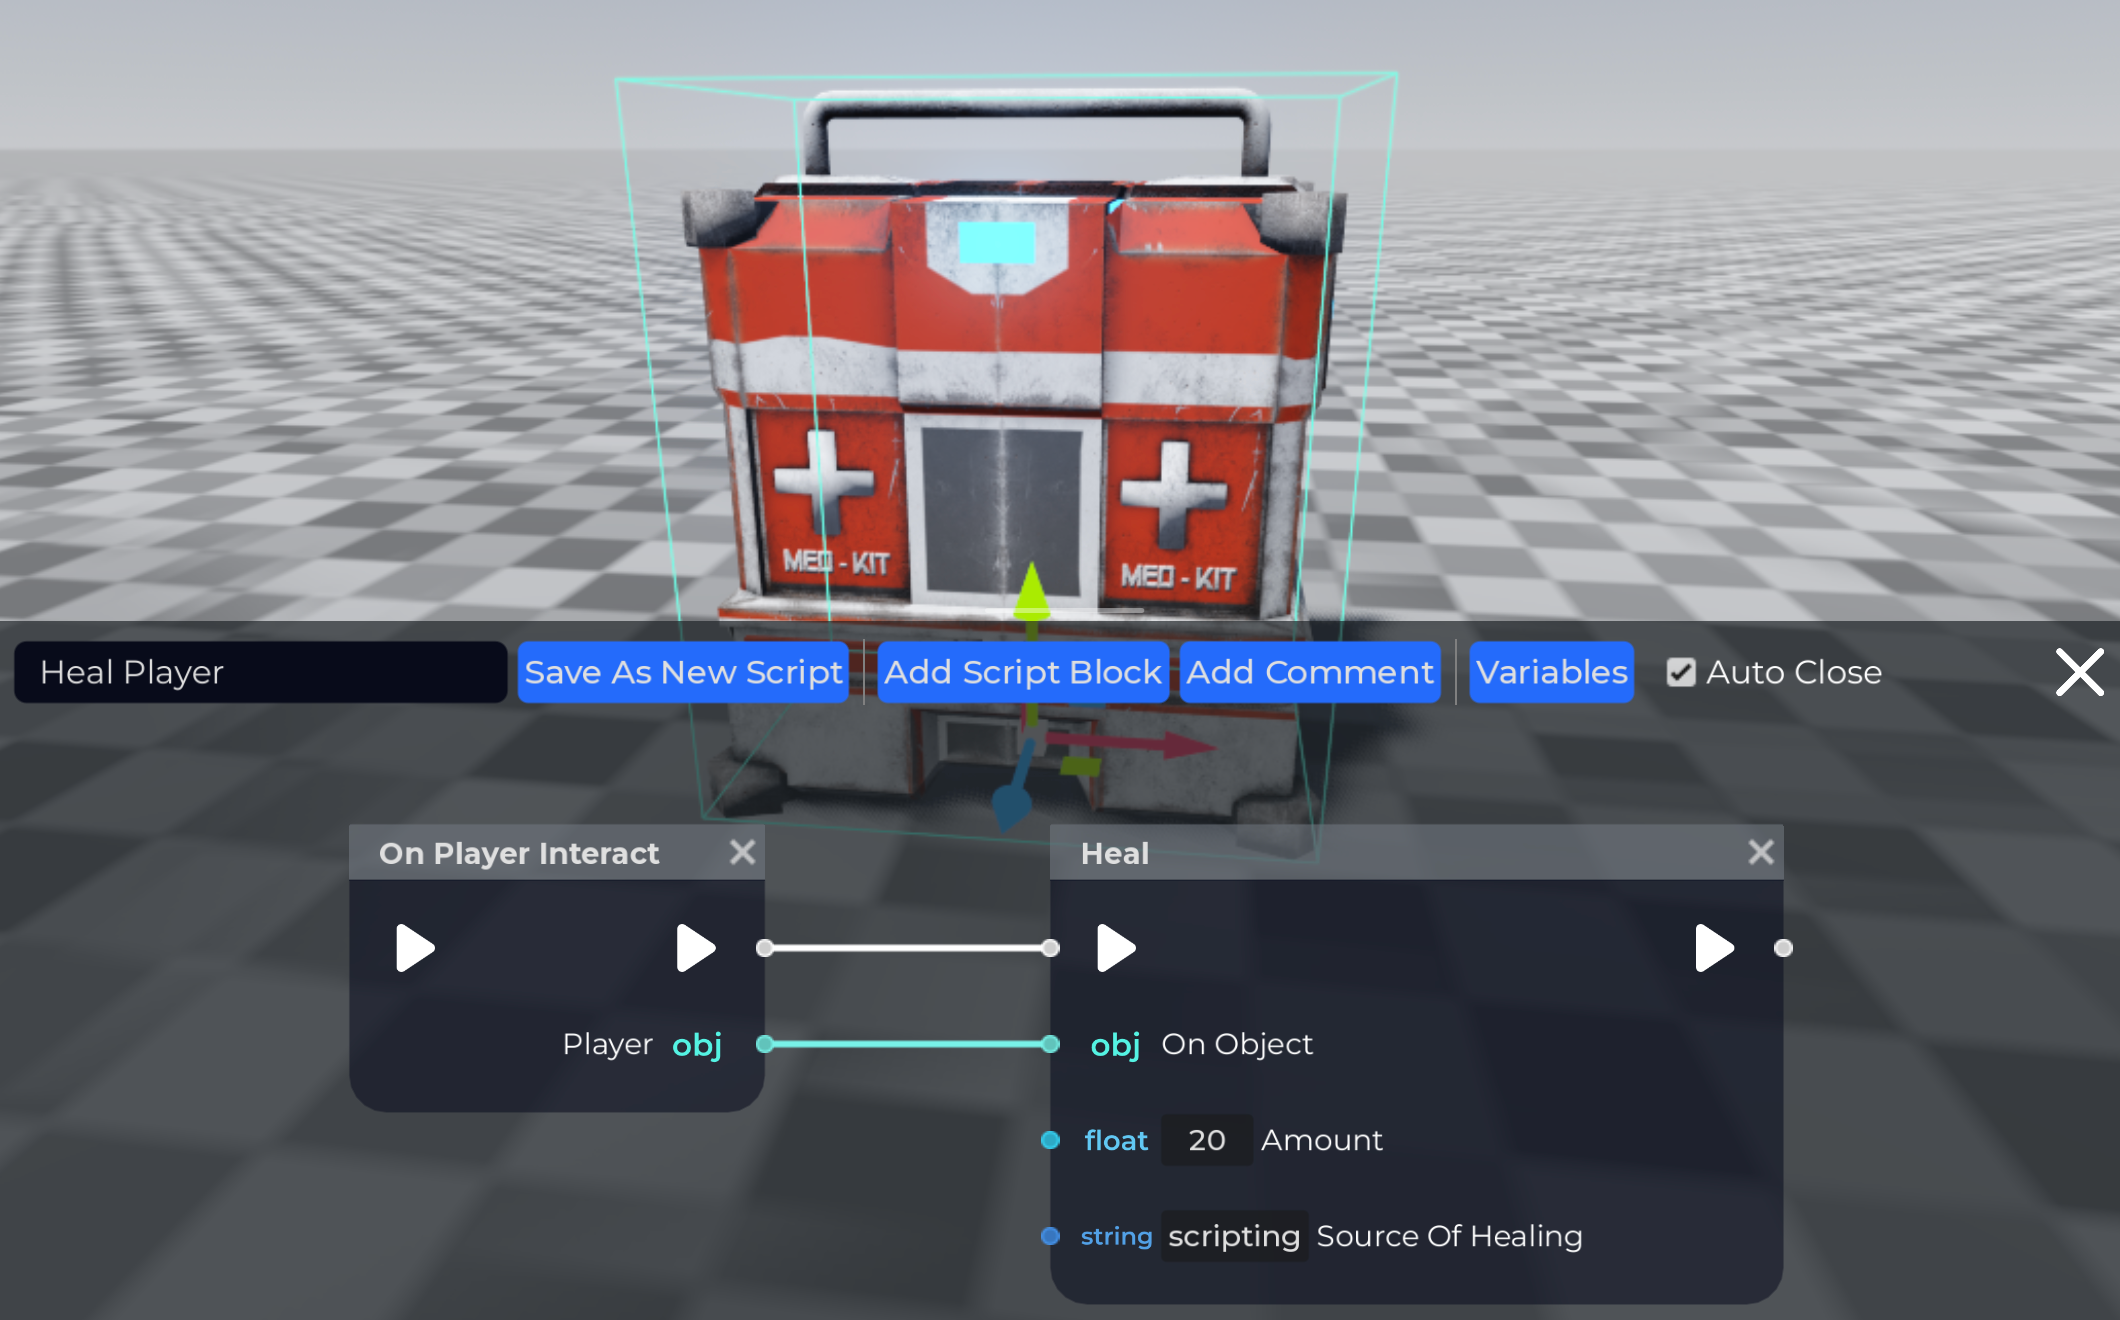
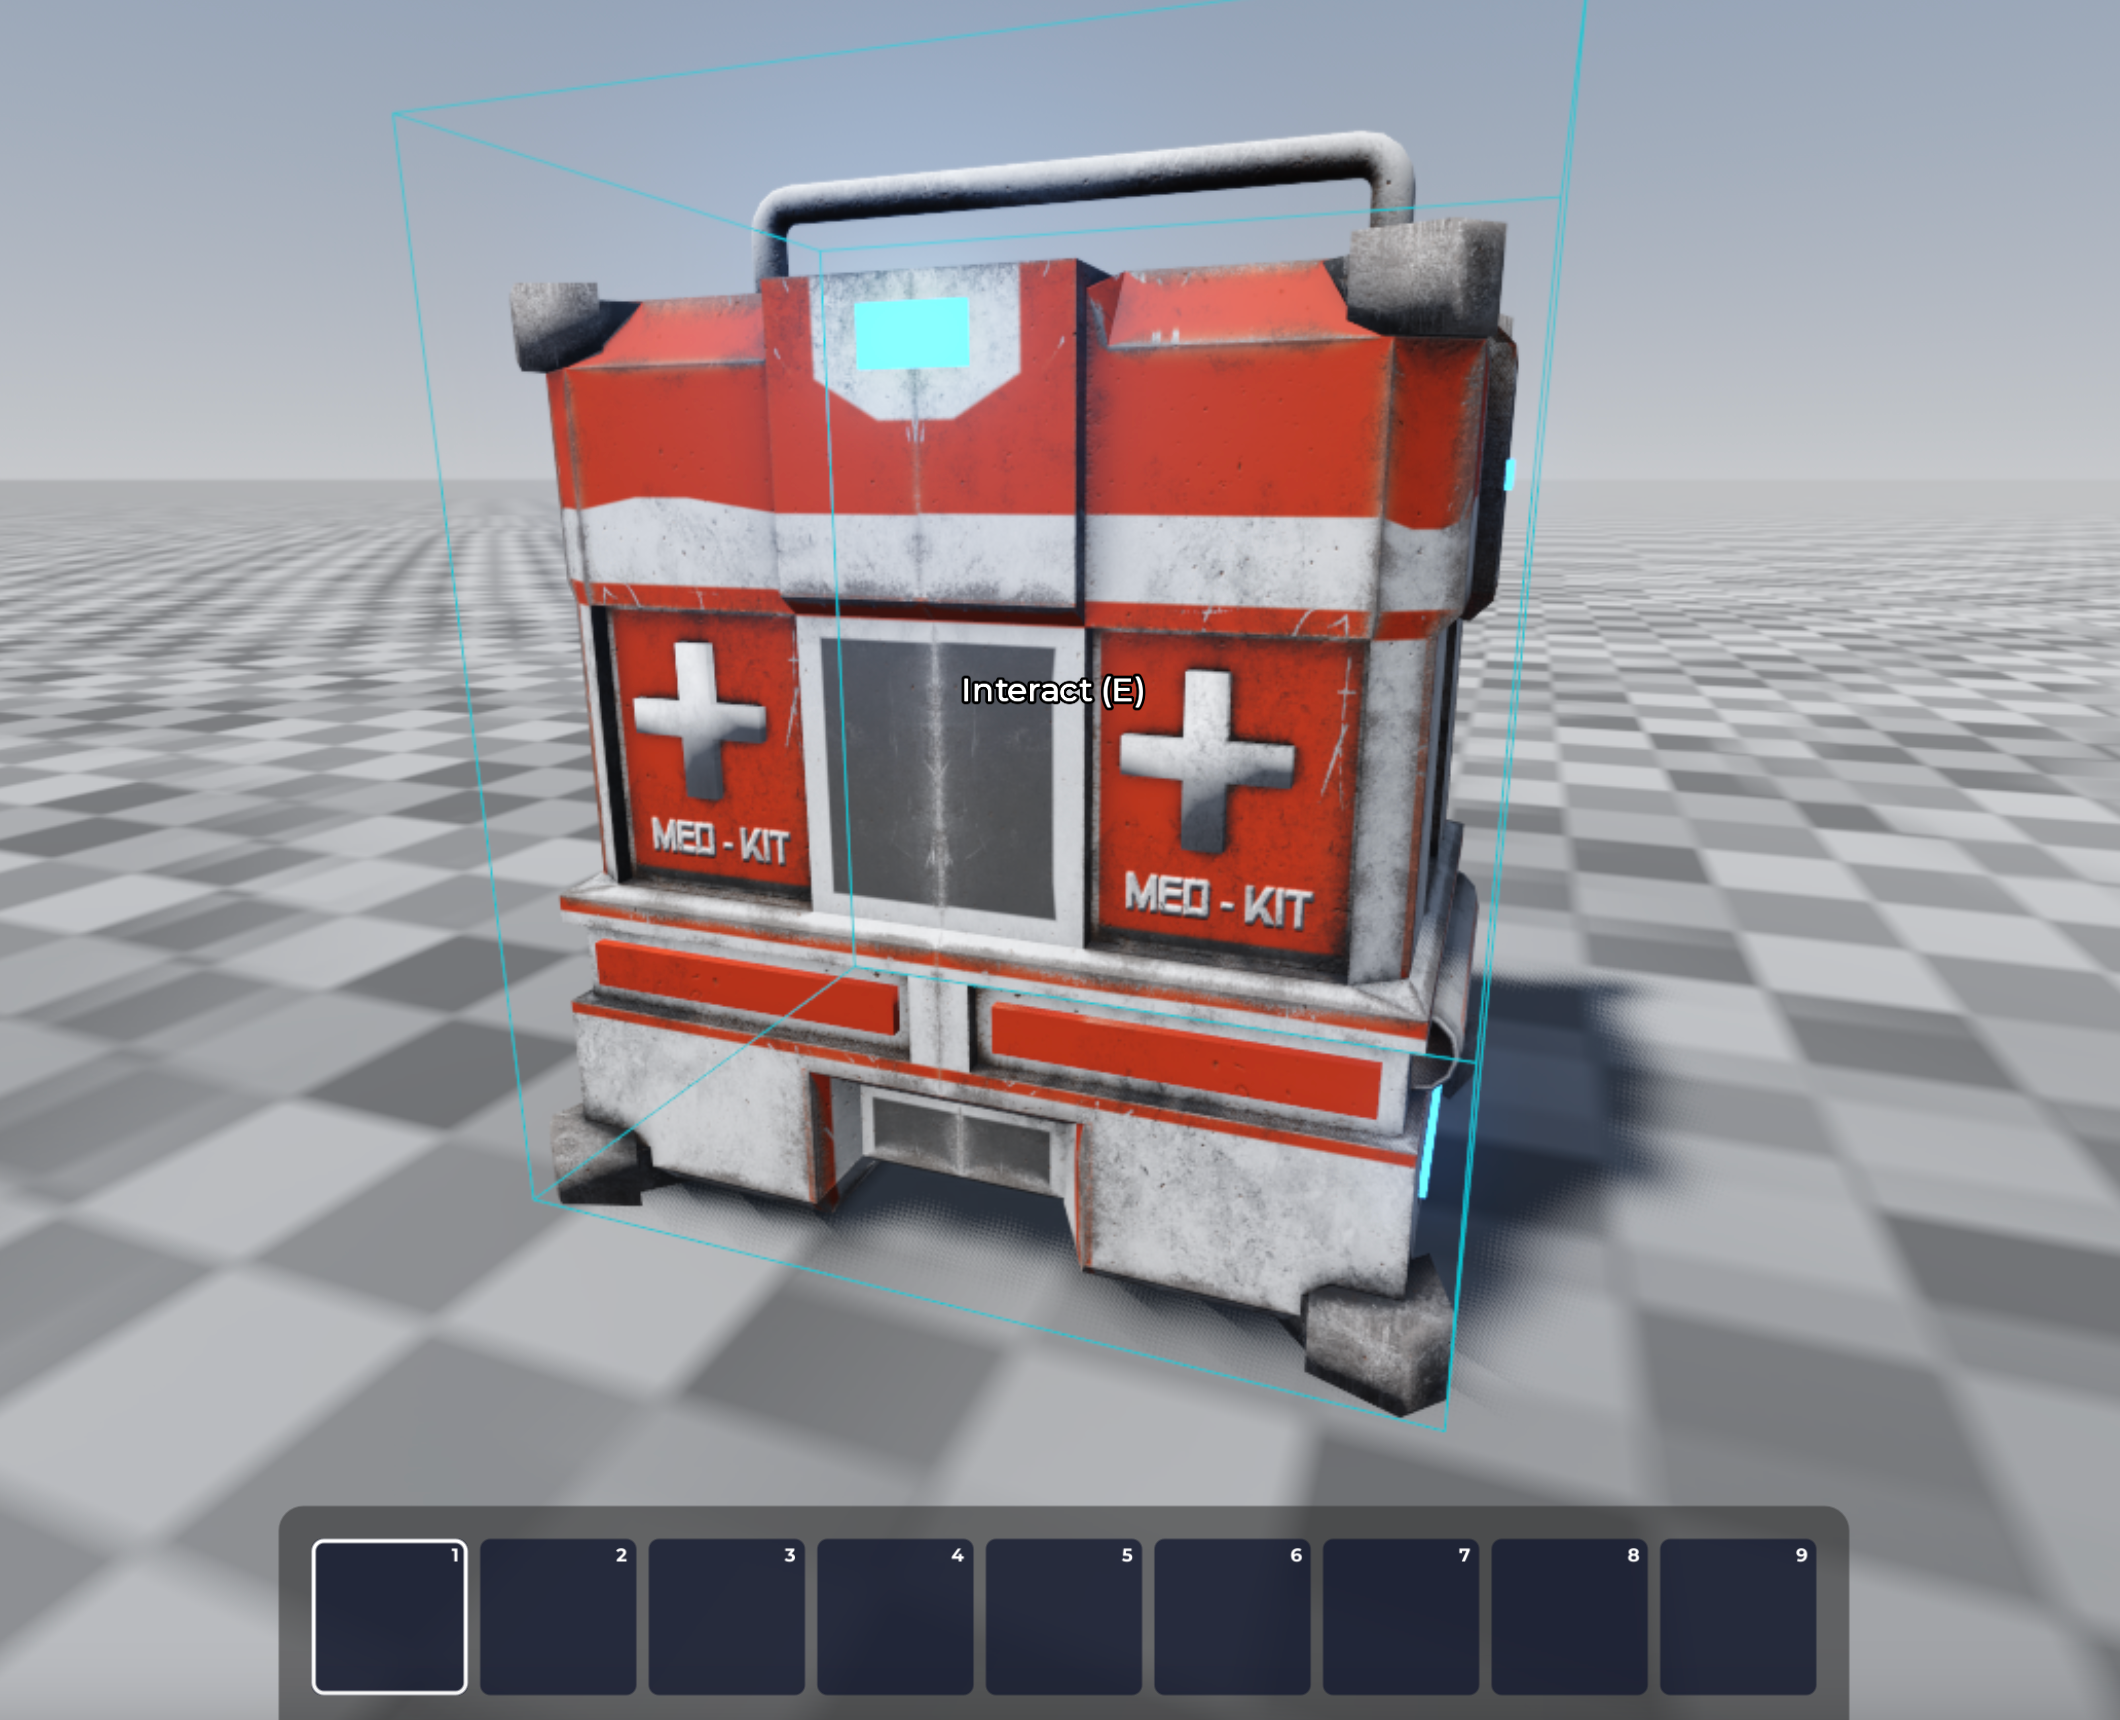
Exit Build Mode by pressing B on your keyboard. With your character, walk up to the medkit and look at it. You should see a text that says "Interact (E)".
Now you can press E on your keyboard to use the medkit. Note that if you have full health, the Heal block will not do anything. To test it, you will need to damage yourself, such as by interacting with the candles, or getting a friend to shoot you with a gun.
Cactus
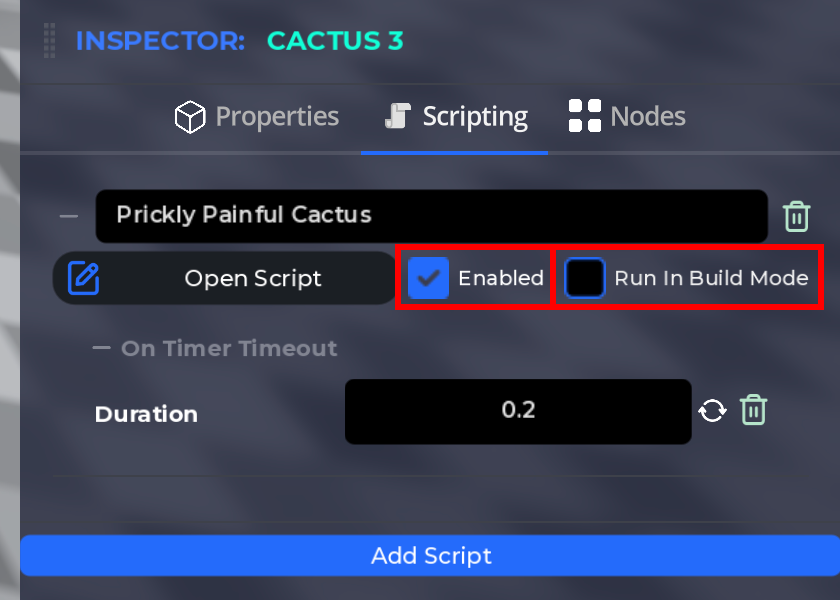
Next, let's make something more advanced, a cactus with a timer that hurts a Player if they get very close to the cactus. We want to keep hurting them until they get away from the cactus, so we will use an "On Timer Timeout" entry to run the script frequently. We will set the duration to 0.2 to make it run every 0.2 seconds (5 times per second). We need to get a player within a short distance, but only run the hurt block if we found a player.
Take a look at the script below and replicate it in your Space, then try standing next to the cactus. If you did it right, it will hurt you. You may need to tweak the "Range" depending on the size of your objects. Note that "Range" is in meters, as are all distances in The Mirror.
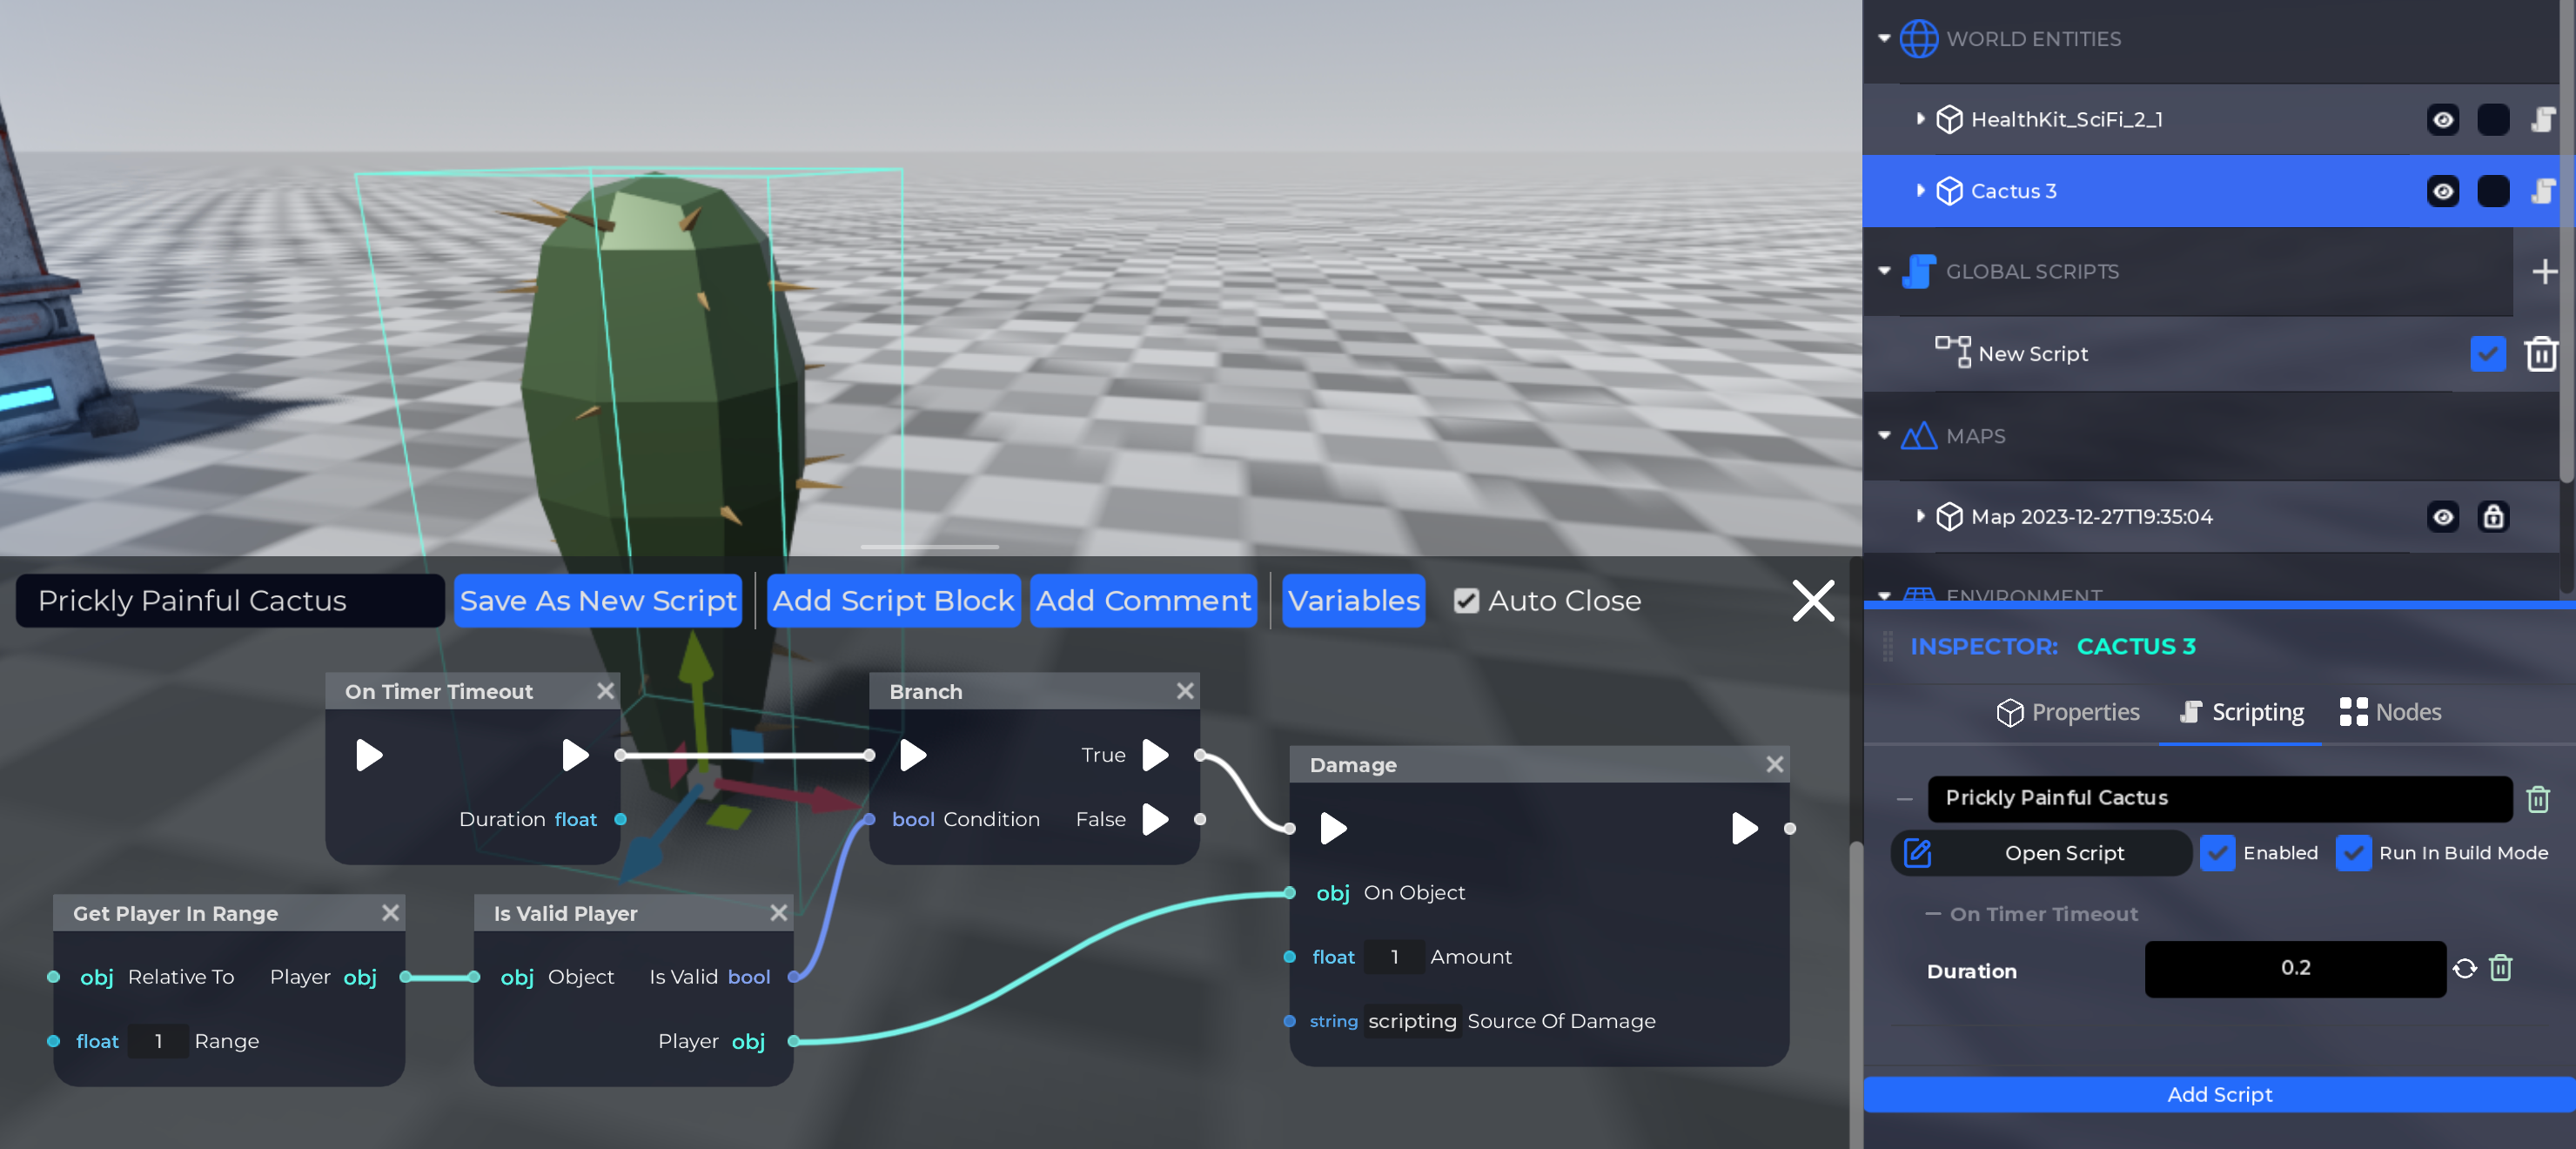
You can control when the script is allowed to run using the "Enabled" and "Run In Build Mode" checkboxes in the script inspector. This allows you to temporarily disable a script for testing, or to ensure a script only runs when playing the game. By default, scripts will run in Build mode, while you are building your Space. Perhaps you don't want a cactus to hurt you while you are building your Space, so you can uncheck "Run In Build Mode" to disable it while building.